Introduction
Visual Studio Code (VS Code) is a powerful and versatile code editor that has gained immense popularity among developers worldwide. One of its most useful features is the ability to use multiple cursors, which allows you to make edits in several places simultaneously. This feature can significantly increase your productivity by reducing the time spent on repetitive tasks such as renaming variables or adding similar lines of code. In this article, we will guide you through the process of using multiple cursors in VS Code, including how to select and edit with multiple cursors and how to navigate between them. We will also provide separate shortcut keys for Mac, Windows, and Linux users for your convenience. Whether you’re a seasoned developer looking to streamline your workflow or a beginner just getting started with VS Code, understanding how to effectively use multiple cursors can be a game-changer for your coding efficiency.
Step 1: Selecting Multiple Cursors
The first step in using multiple cursors in VS Code is to select the locations where you want your cursors to be. There are several ways to do this, and we will cover the most common methods.
One way is by holding down the Alt key (on Windows and Linux) or ⌥ (option) key (on Mac), and then clicking at the desired locations with your mouse. This will create a new cursor at each click point.

Another method is by using keyboard shortcuts. If you want to place a cursor above or below the current cursor, use Ctrl+Alt+Up or Ctrl+Alt+Down on Windows, Ctrl+Shift+Up or Ctrl+Shift+Down on Linux, or ⌥⌘↑ or ⌥⌘↓ (Option+Cmd+Up/Down) on Mac.
This shortcut allows you to quickly select additional instances of the word under the cursor or the current selection, making it easier to edit multiple occurrences of a specific piece of text across your document in Visual Studio Code. This feature is particularly useful for renaming variables or updating specific strings throughout your codebase efficiently.

Another option is to use Ctrl+D on Windows and Linux or ⌘D on Mac. The first time you issue this command, it selects the word at the cursor. Pressing it again will select the next occurrence of the same word, and so on. This shortcut allows you to quickly select additional instances of the word under the cursor or the current selection, making it easier to edit multiple occurrences of a specific piece of text across your document in VS Code. This feature is particularly useful for renaming variables or updating specific strings throughout your codebase efficiently.
Similarly, to immediately select all occurrences of a specific word for editing, simply highlight the word and press Ctrl+Shift+L on Windows/Linux or ⇧⌘L (Shift+Cmd+L) on Mac. This will create a cursor at every occurrence of that word in your document.
Remember that these are just some of the ways to select multiple cursors in VS Code. The editor offers many other options which can be found under Selection menu.
Step 2: Editing with Multiple Cursors
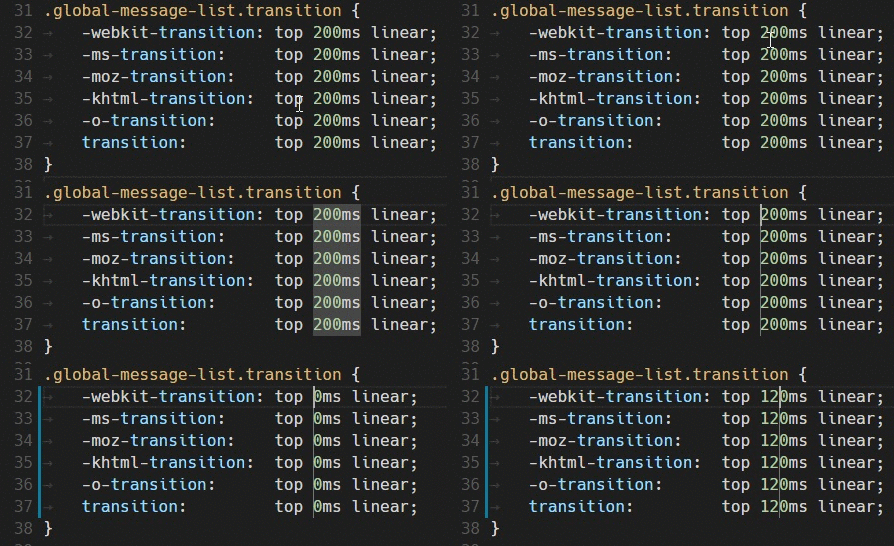
Once you have selected multiple cursors, the next step is to start editing. The beauty of this feature is that whatever you type or delete will be replicated at all cursor locations simultaneously. This can be incredibly useful for tasks such as renaming variables, adding or removing code comments, and more.
For instance, if you want to change a variable name throughout your code, simply select all occurrences of the variable using the method described in Step 1 and start typing the new name. You’ll see that it changes everywhere at once.
Similarly, if you need to add a comment before several lines of code, place cursors at the beginning of those lines and type your comment - it will appear on each line where a cursor was placed.
It’s important to note that clipboard commands like cut (Ctrl+X or ⌘X), copy (Ctrl+C or ⌘C), and paste (Ctrl+V or ⌘V) also work with multiple cursors. If you copy a line of text and then paste it while having multiple cursors selected, it will paste into each location.
Using multiple cursors for editing can significantly speed up your coding process by reducing repetitive manual tasks.
Step 3: Navigating Between Multiple Cursors
After you’ve placed multiple cursors and started editing, it’s also important to know how to navigate between them. This can be particularly useful when you need to make slight variations in the edits at different cursor locations.
To move between your cursors, use the F7 key (for next cursor) and Shift+F7 (for previous cursor) on all platforms—Windows, Linux, and Mac. When you press these keys, VS Code will cycle through each of your cursors in turn, allowing you to make individual adjustments as needed.
Another handy feature is the ability to deselect a cursor if you’ve accidentally placed one in the wrong location. To do this, simply place another cursor at the same location by clicking while holding down Alt or ⌥, or using the relevant keyboard shortcut for your platform.
Mastering navigation between multiple cursors can help ensure that your edits are precise and accurate. It gives you fine-grained control over each edit point while still benefiting from the speed and efficiency of multi-cursor editing.
Conclusion
In conclusion, using multiple cursors in Visual Studio Code is a powerful feature that can significantly enhance your coding efficiency. By allowing you to make simultaneous edits at various points in your code, it reduces the time and effort spent on repetitive tasks. We’ve walked through the steps of selecting multiple cursors, editing with them, and navigating between them. We also provided platform-specific shortcut keys for Windows, Linux, and Mac users.
Remember that like any tool or feature, mastering multiple cursors requires practice. Don’t be discouraged if it feels awkward at first; with time and use, it will become second nature. The key is to start incorporating it into your regular coding workflow gradually.
Visual Studio Code’s multi-cursor functionality exemplifies its commitment to providing developers with tools that streamline their work process and boost productivity. So go ahead - give multiple cursors a try in your next coding session!